I get asked from time to time how to get started with woodworking. Specifically, how to get started in woodworking if you want to work like me: with a decreased utilization of power tools. Read this post for more information on what this means and how I came to it. For a few suggestions, read on.

First of all, the main thing to do is just to start. It really doesn’t matter if you have fancy tools or stuff you picked up at the home center, eastern or western-style saws, construction lumber or highly figured bird’s eye maple. Picking up the tools and making big pieces of wood into smaller ones is the most important thing. Really. It’s definitely more important than agonizing over whether you have the “right” tools or the “right” project to get started on. (At some point I need to write about how the word “should” is one of my least favorite in the English language.)
Second, in the long term you’re going to need to know what you want to make. Are you interested in furniture? Boxes? Wood turning or carving (each of which are arguably whole different disciplines)? High end stuff? Rustic? Generally when I ask people this question the answer I get back is some version of, “I don’t know I just want to woodwork”. Which is fine for now – there are plenty of baseline skills you can acquire while you figure it out. But over the long run, you’ll probably gravitate towards one type of work or another – unless you’re like me and you try to do absolutely everything – and it will affect the tools you buy and the way you work.
But okay, you really just want some suggestions to get started. Sure, no problem. I think no matter what you want to do, there three basic skills and a few simple tools that will get you going and make you smarter about woodworking no matter what your final path: sharpening, planing, and sawing.
Sharpening
Sharpening is the gateway skill for hand tool woodworking. And even if you envision yourself with a Norm Abram-like shop full of power tools, knowing how to use hand tools will make you a better woodworker. And hand tools work best (work at all, arguably) when sharp. So learn to sharpen!
I think there are only three secrets to sharpening:
- It doesn’t really matter what method you use. Water stones, oilstones, diamond, sandpaper, whatever. They all work. Pick one. I suggest sandpaper in a progression of grits – try 400, 800, and 1600 – glued with spray adhesive to whatever fairly flat 12×12 tile you can find.
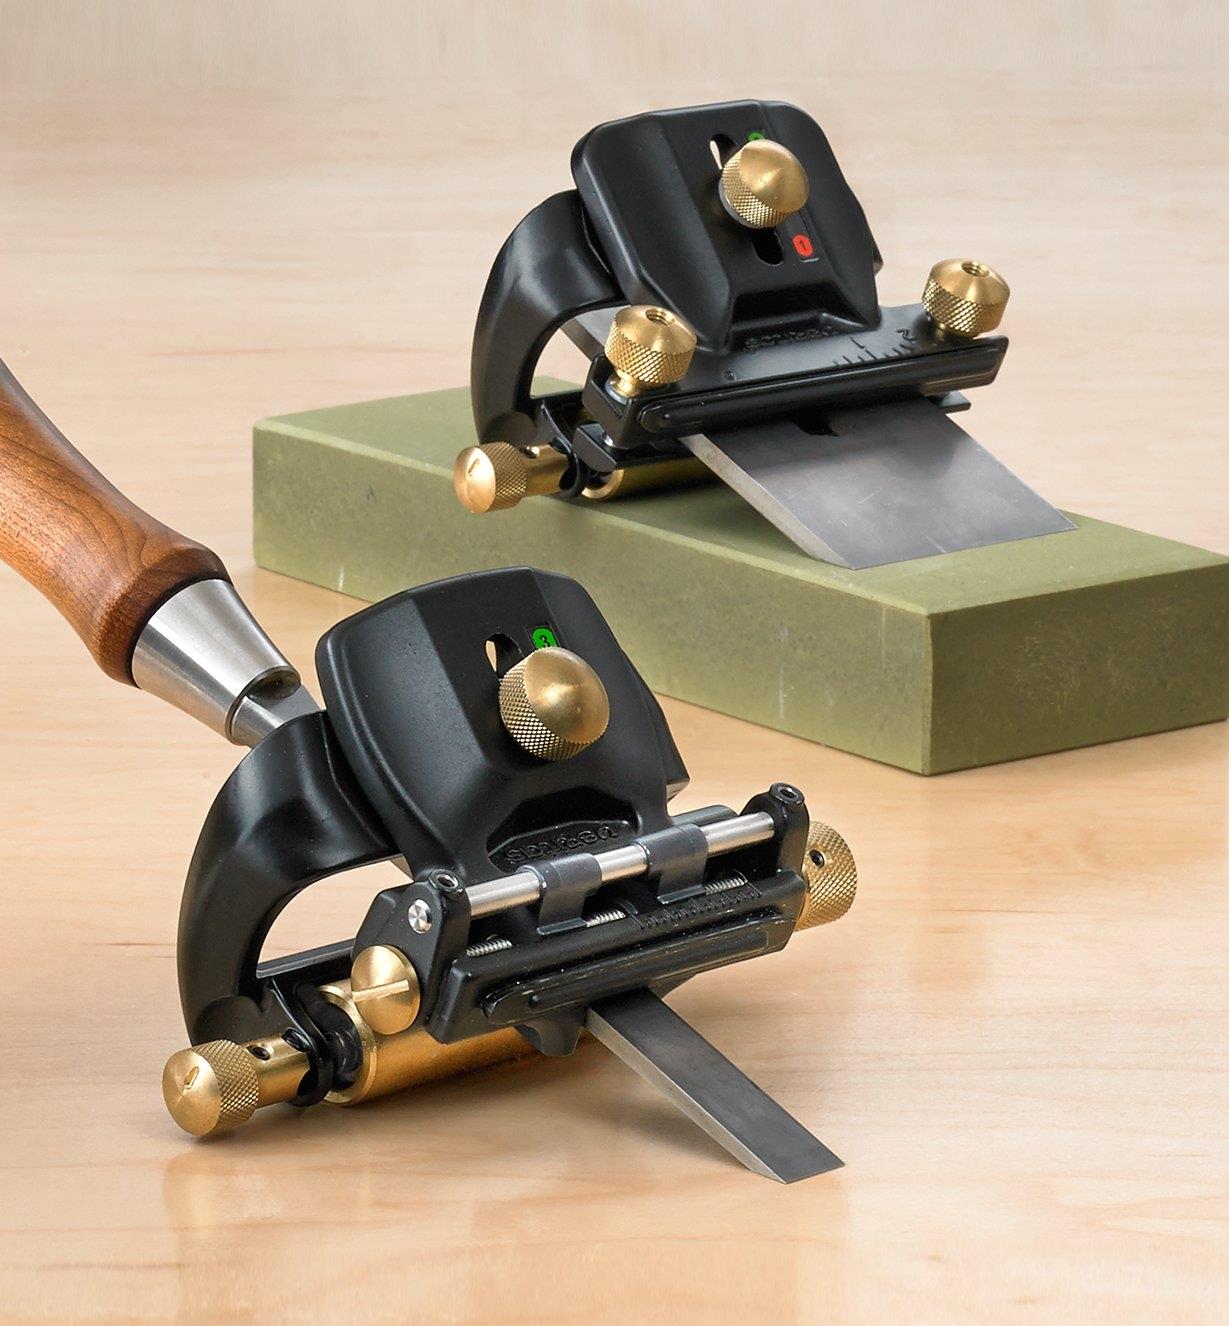
- Use a jig. Some people will say this is cheating. This is nonsense. You can work your way up to freehand if you want to. I haven’t yet. But you’ll get good results right away with a jig. I like the Veritas one but it’s a little pricey. There are cheaper options that I have heard work well but that I haven’t used myself.
- Sharpen each grit until you can feel a burr all the way across. A burr is a tiny, almost microscopic peel of metal that shows up when you’ve thinned the edge all the way down to sharp. When you feel it, move on to the next (higher numbered) grit.
Is there more to it? Yes, of course. There always is for the fundamentals. But if you do the above you’ll be years ahead of where I was when I started. You can start with this and you’ll get tools that are sharp enough to do good work.
Oh, and sharpen often. The more you do it, the easier it gets, and dull tools will not give you the correct feedback you need to get smarter about the craft. Sharp tools will teach you more.
Planing
I find hand planes to be a joy to use. There’s something really satisfying about making dozens (or hundreds, or thousands) of little curls of wood, leaving a glossy-smooth finish that requires little or no sanding. Even the sound of it is pleasant to me. They do, of course, require a little bit of learning.
For starters, you need to know what to get. Planes come in a bewildering variety of sizes and shapes. Wooden bodies, metal bodies, infill planes, plow planes, plough planes (are those the same thing? (yes)), bench planes, block planes, jack planes, numbers one through one million, bevel up vs. bevel down, etc. etc. etc. It’s overwhelming to the beginner.
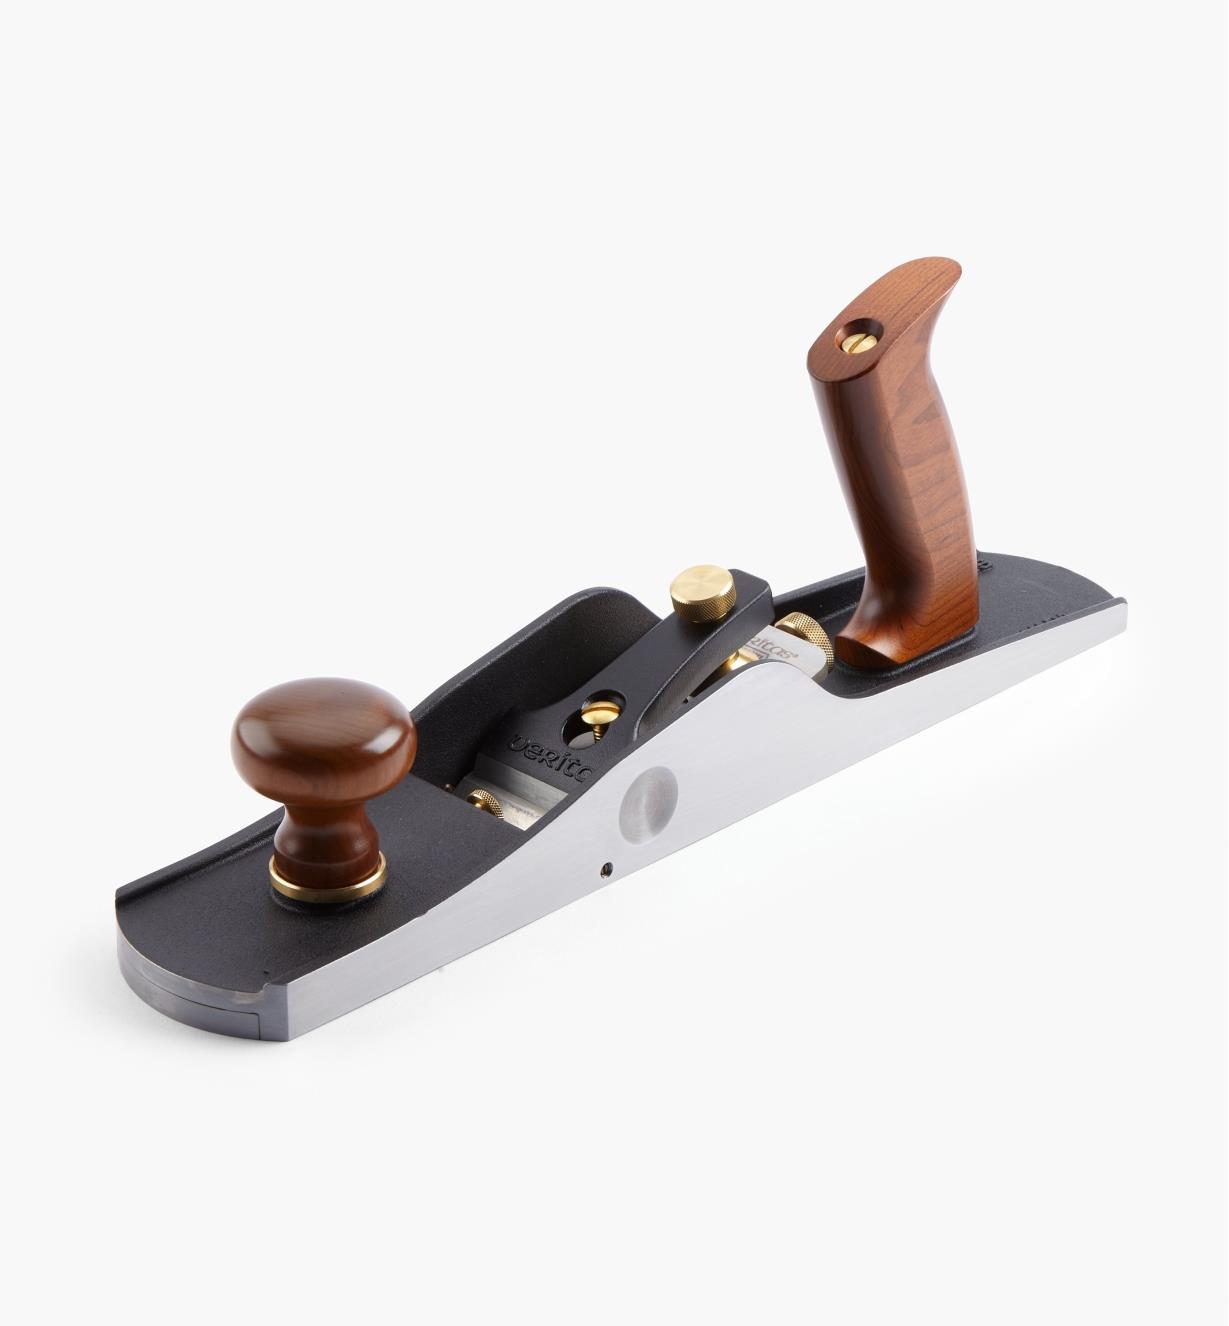
What you wind up owning over the long term will fall out of the work you choose to do. But here, at the beginning, if you don’t have a good idea, I will suggest two planes: the Lee Valley Low Angle Bevel Up Jack Plane and the Veritas #4 Smooth Plane. These are fairly expensive, but you will absolutely not regret buying them. If you need to shave a few bucks, I think you can get away with a much cheaper #4 (warning: I have not used that one). It’ll probably require investment on your part to get it working, but I’ve used cheap smoothers and gotten good results from them.
The jack plane, on the other hand, you should just buy. For one thing, I think it’s good to own at least one really good hand tool, just to give you a sense of what the possibilities are. But the word “jack” in the type name is short for “jack of all trades”, and it’s true. You’ll be able to use the jack plane for jointing (straightening) edges, flattening faces, and, perhaps most importantly, shooting.
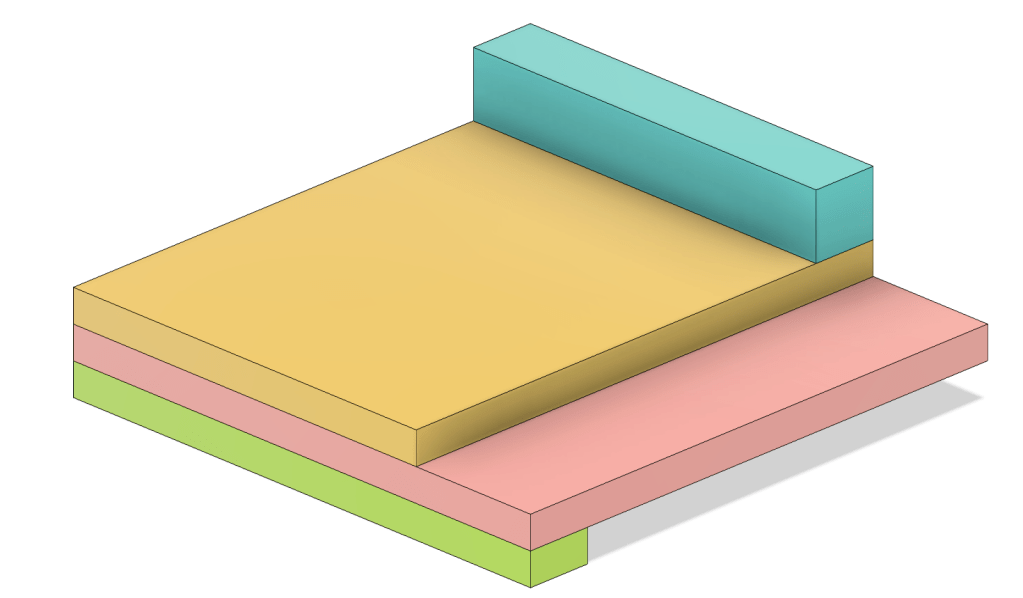
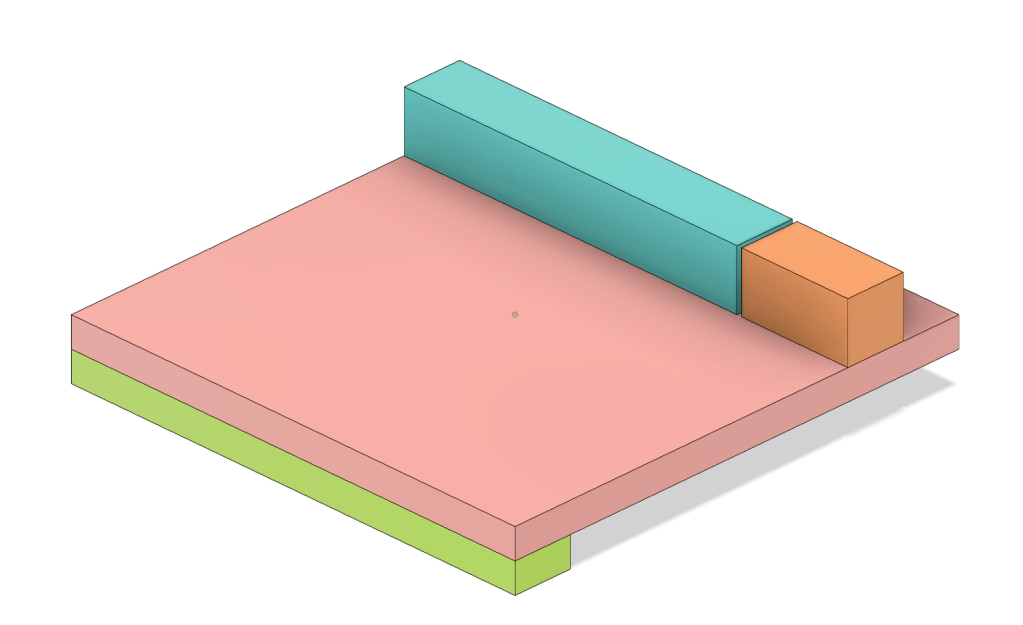
Shooting is the process of shortening a board while simultaneously making the ends flat and square. This operation happens on the end grain of boards, which is the hardest direction to cut, and the jack plane’s low angle makes it very good at this task. You’ll need to build a shooting board to make this task easy, but that’s an excellent beginner’s project. Be wary of the more complex designs on the internet. You only need to attach four pieces of wood together – a shelf, a base, a fence, and a cleat, attached as shown in the picture above. Use any material. Plywood is a good choice. You need to make the fence and the end of the base square to each other, as the plane will follow the edge of the base, so the squareness of your result depends on this setup. Using screws to attach the fence to the base means if you mess it up you can adjust it later.
If you want to go one farther, the next plane I’d recommend would be a plow plane, like the Veritas Small Plow Plane. Plow planes are the tool you use to make a groove on the edge or face of a board. You’ll want this when you start making frames, which is a common operation for almost any sort of casework. But you can get by without it – you can saw or mark the edges of the groove and clean it out with a chisel. It’s just a lot easier with a plow plane.
Awesome. Now sharpen your blades and make some shavings. Oh and hint: get the O1 blades for your jack plane. It’s a slightly softer metal as compared to the A2 or fancier PM-V11 steels, so it dulls faster, but it’s easier to sharpen. And at this stage you want to have practice sharpening.
Sawing
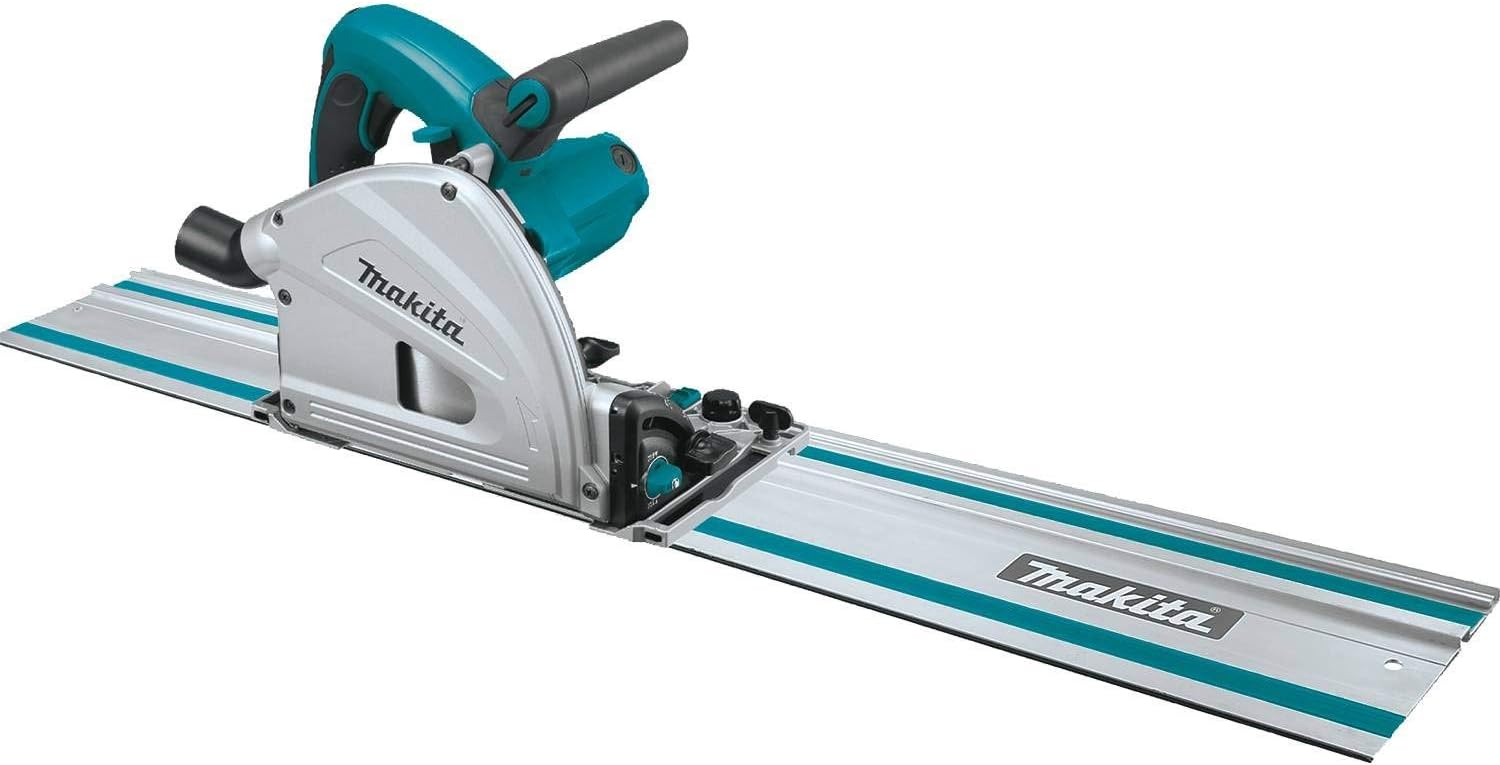
Obviously, you’ll need a way to make large boards into smaller boards. This is the place that people often reach for power tools: table saws, circular saws, and the like. And, frankly, so do I. Cutting seven foot long rip in an inch-and-half thick board takes a lot of muscle power. I enjoy it for a while, but there’s a limit. So for long cuts made with the grain (called a rip cut), you might want to consider your powered options. Personally, I dislike table saws. I much prefer a band saw for almost everything I would use a table saw for. Knowing how to use planes here is key, as the finish off a band saw can be a bit rough, but it’s the work of moments with a hand plane to bring it to finish quality. I also have a track saw, which in my opinion is both better and safer than a table saw when it comes to breaking down sheet goods (plywood).
For crosscutting, however, I almost always cut by hand. Even through thick material, cutting a single board to length is generally the work of moments. Even if you include shooting it afterward to get the length absolutely perfect, it almost always takes less time than setting up for a cut on a miter or table saw would be.
If the work is small, it’s usually more convenient and accurate to cut using a bench hook. This is another very simple beginner project. If you leave space on the back side of the fence, you’ll be able to use it with either Western style saws that cut on the push stroke or Eastern style saws that cut on the pull stroke.
As for what saws to get, I think you can go a long way with just three very affordable options. For crosscutting large stock, I love this saw. For less than $30 it is outstanding at knocking boards down to width rapidly. Then, for joinery, I recommend a cheap eastern-style pull saw, like this one. With those two, you’ll be able to do almost everything you need for your first several projects.
You’ll notice I don’t have a recommendation for a rip saw. There are two reasons for that. First, ripping by hand gets old fast. Second, I don’t actually own a rip saw that I like very much. I bought one I can’t find the link for but really, it was sort of disappointing. It helped to set the teeth, but I still reach for it extremely rarely.
The other reason is that this is a place where power tools are my go-to option. You can do most of the rips you’ll need with a circular saw and some sort of edge guide – spend a little time learning to plane and you can take the resulting cut down to exact dimensions easily. Or, if you want to upgrade, look into getting a track saw. Track saws are like circular saws, but they ride on a track to make getting safe, accurate cuts super easy. They even have excellent dust collection. For cutting plywood, they’re unsurpassed. But they’re a bit pricey, and you definitely don’t need one to get started.
Chisels
I’ll probably get a lot of flack for this one, but just go buy some chisels at the home center. I’ve got nice ones and not-nice ones, and I can’t really tell the difference. You might be able to once you’ve used them for a while, but at the outset of your woodworking I just don’t think it matters that much. You’ll want at least 1/4″, 1/2″, 3/4″, and 1″ widths, but those shouldn’t be hard to come by. The main thing is to keep them sharp – dull chisels not only don’t work as well, but are more dangerous, as they are more likely to slip.
Get Started!
OK, you’re all tooled up! Now what? Well, make something, even if it’s just practicing cutting dovetails in a piece of scrap, birdhouses, or whatever. But maybe you don’t have anything in mind. In that case, I would suggest making a workbench. Simple ones that will last you for decades can be made in a weekend, and they will make everything you do afterward that much easier. A great place to start is The Naked Woodworker, by the dryly hilarious Mike Siemsen. The video will take you step by step from not owning any tools to having a functional workbench.
An alternative approach would be to read The Anarchist’s Workbench. It’s hard to go far in hand tool woodworking without encountering Christopher Schwarz, who has written extensively about his experience and philosophy in woodworking. (If you want to know about the curious title, there’s a FAQ.)
If neither of those is your cup of tea, you can also try The New Traditional Woodworker, by Jim Tolpin. It’s a good intro to woodworking with mostly hand tools, and it includes a number of projects aimed at improving your shop. It’s a curious fact, but if you’re anything like me, something like half of the things you will make in your workshop will be FOR your shop.
But really, JUST MAKE SOMETHING. And, hopefully, in so doing, get smarter!
Did any of these suggestions ring true to you? Do you think I’m way off base? Have ideas about what you think beginners might benefit from? Drop a comment below. Thanks!

Great content! Love the blog and videos. I often drive by Lie-Nielsen Toolworks in Warren, Maine. I’ve got to make a point to pick up one of their planes as I’ve heard from many how great they are.
LikeLike
Oh yeah, the Lie-Nielsen stuff is really, really nice. The Lee Valley stuff tends to be a bit more affordable in general but I think you’re going to be pleased with either one. I don’t own any LN planes, though, so that’s hearsay on my part.
LikeLike
Also, thanks!
LikeLike